Google Tag Manager integration guide
What is Google Tag Manager (GTM)
Google Tag Manager (GTM) is a *free tool provided by Google that allows users to manage and deploy marketing and analytics tags (snippets of code) on their website or mobile app without needing to modify the underlying codebase. It simplifies the process of tracking user interactions, such as page views, clicks, and conversions, by enabling marketers and analysts to add and update tags through a web-based interface rather than relying on developers.
GTM helps streamline the implementation of third-party tools like Google Analytics, Facebook Pixel, and various ad platforms. It supports both client-side and server-side tagging, giving businesses flexibility in how they manage tracking across their digital properties. This tool enhances efficiency, reduces the risk of code errors, and improves the overall speed of deploying and updating tracking mechanisms.
*While use of Google Tag Manager by itself is free, when using a server-side setup, hosting and infrastructure fees such as hosting using Google Cloud Platform (GCP) will be incurred.
Why Moloco recommends using GTM Server-side
Google Tag Manager can operate server-side. It means all the data collection and forwarding can be done server-side, as opposed to client-side by default.
Moloco recommends the use of GTM server-side for the following 3 reasons:
- Reduce load on a page: instead of loading and running Javascript snippets to forward events to Moloco from client side, those can be offloaded server-side, reducing page load time.
- Reduce impact of ad blockers: with server-side tagging, you can create a custom 1st party subdomain to which you can send the user event data (e.g., analytics.yourdomain.com or yourdomain.com/analytics) avoiding any potential ad blockers that would block HTTP request to non-first party domains.
- Secure MCM API key: Moloco Commerce Media (MCM) APIs are called using an API key (read here for generating one for your platform). Calling MCM APIs from server-side containers will prevent exposing the API key publicly, avoiding any of the risks described here.
For those reasons, we recommend sending user events data to MCM from a server-side GTM container. Note that when choosing to send event data to Moloco servers using a server-side GTM container setup, a client-side Google Tag Manager is still necessary. Before viewing the rest of the below guide, first refer to this official guide from Google for setting up a server-side Google Tag Manager container, and then this official guide for how to send data from your website to the server-side Google Tag Manager.
Recording user events using Google Tag Manager
Tag Manager provides a way to manage and test multiple tags without many server-side code changes to your site.
Some decisions you make during setup depend on whether you are using Google Analytics and Google Analytics Ecommerce. Google Analytics Ecommerce can be implemented using Google Analytics 4 or Enhanced Ecommerce.
Neither Google Analytics nor Google Analytics Ecommerce is required; if you don't use them, you can manually populate your site's data layer code after creating the tag.
Google Analytics Ecommerce is an additional configuration for Google Analytics that passes product titles, IDs, prices, transaction details, and other structured ecommerce data to Google Analytics. MCM can leverage the Google Analytics Ecommerce data layer, so if you have that set up already, configuration can be easier. If you don't have Google Analytics Ecommerce configured for Google Analytics but want to use it, see more details and setup instructions in the GA4 developer guide
Use this one-time procedure to set up a Moloco Commerce Media tag in Tag Manager for recording user events.
Standard GA4 ecommerce event & MCM mapping
This table describes the mapping of standard GA4 ecommerce events with MCM event types.
| GA4 ecommerce Event Name | MCM Event Name | Notes |
|---|---|---|
| add_to_cart | ADD_TO_CART | |
| page_view | PAGE_VIEW | |
| view_item | ITEM_PAGE_VIEW | |
| page_view | HOME | Only triggers HOME event when page_path == “/” |
| purchase | PURCHASE | |
| search | SEARCH | |
| page_view | LAND | Only triggers when page_referrer contains a different domain from retailer’s one. |
| add_to_wishlist | ADD_TO_WISHLIST |
Important to noteMCM expects to receive a PAGE_VIEW event when a user navigates to any page that is not the homepage or PDP page.
For homepage and PDP, you should respectively trigger HOME and ITEM_PAGE_VIEW events.
When a user lands on your website from an external source, you should trigger both the LAND event and the appropriate page view event (either HOME or ITEM_PAGE_VIEW or PAGE_VIEW).
GTM x MCM integration overview
This is the high level solution architecture:

The diagram shows 3 important steps:
- User event collection on the website or mobile app using the GTM client-side container. Those tags are being forwarded to the GTM server-side container.
- A GTM server-side server has been deployed on Google Cloud. GTM offers a 1-click deployment but the server (Docker container) can be deployed manually on GCP or any other Cloud provider.
- User events are forwarded to MCM using server-side tags. MCM User Event API Template (provided by Moloco) can be imported to facilitate the event forwarding.
GTM server-side deployment
Using the auto-provisioning (1-click deployment), you can deploy a server-side tagging server on Google Cloud. Please follow the instructions available here.
Things to be aware of regarding the tagging server:
- By default, the tagging server will be deployed in the US region (us-central1). If you want to deploy the server in a different region, a manual deployment is recommended (instructions).
- Running a server in the Cloud generates GCP fees. Google provides a simple pricing calculator based on the number of events collected per month. Expect 100 USD/month for 10M events.
- As the server-side container will handle millions of requests, we recommend following Google instructions to disable unneeded logging to avoid generating extra fees.
- The tagging server is updated by Google over time so updating to the latest version will also be required as part of the on-going server operation. You can find server-side tagging server release notes here.
- If you want to host server-side tagging in the same first-party context as your website, we recommend configuring a custom domain for your GTM server (instructions). Same-origin serving is a best practice that lets you leverage the security and durability benefits of server-set cookies.
- GTM server-side doesn’t offer a retry mechanism baked into it so if, for some unexpected reasons, MCM Event API is temporarily unavailable, events will be lost. To mitigate this risk, it is possible to save events to BQ to keep a backup of events or to send failed events into an external queue service (like Cloud PubSub or Cloud Tasks) and build your own retry worker (using Cloud Run on Cloud Functions). Please reach out to your Moloco representative to get advice on the best solution for your needs.
Server-side GTM container config setup
The section below describes the different configurations required for forwarding user events collected on GTM client side to MCM User Event API.
Community Template Gallery
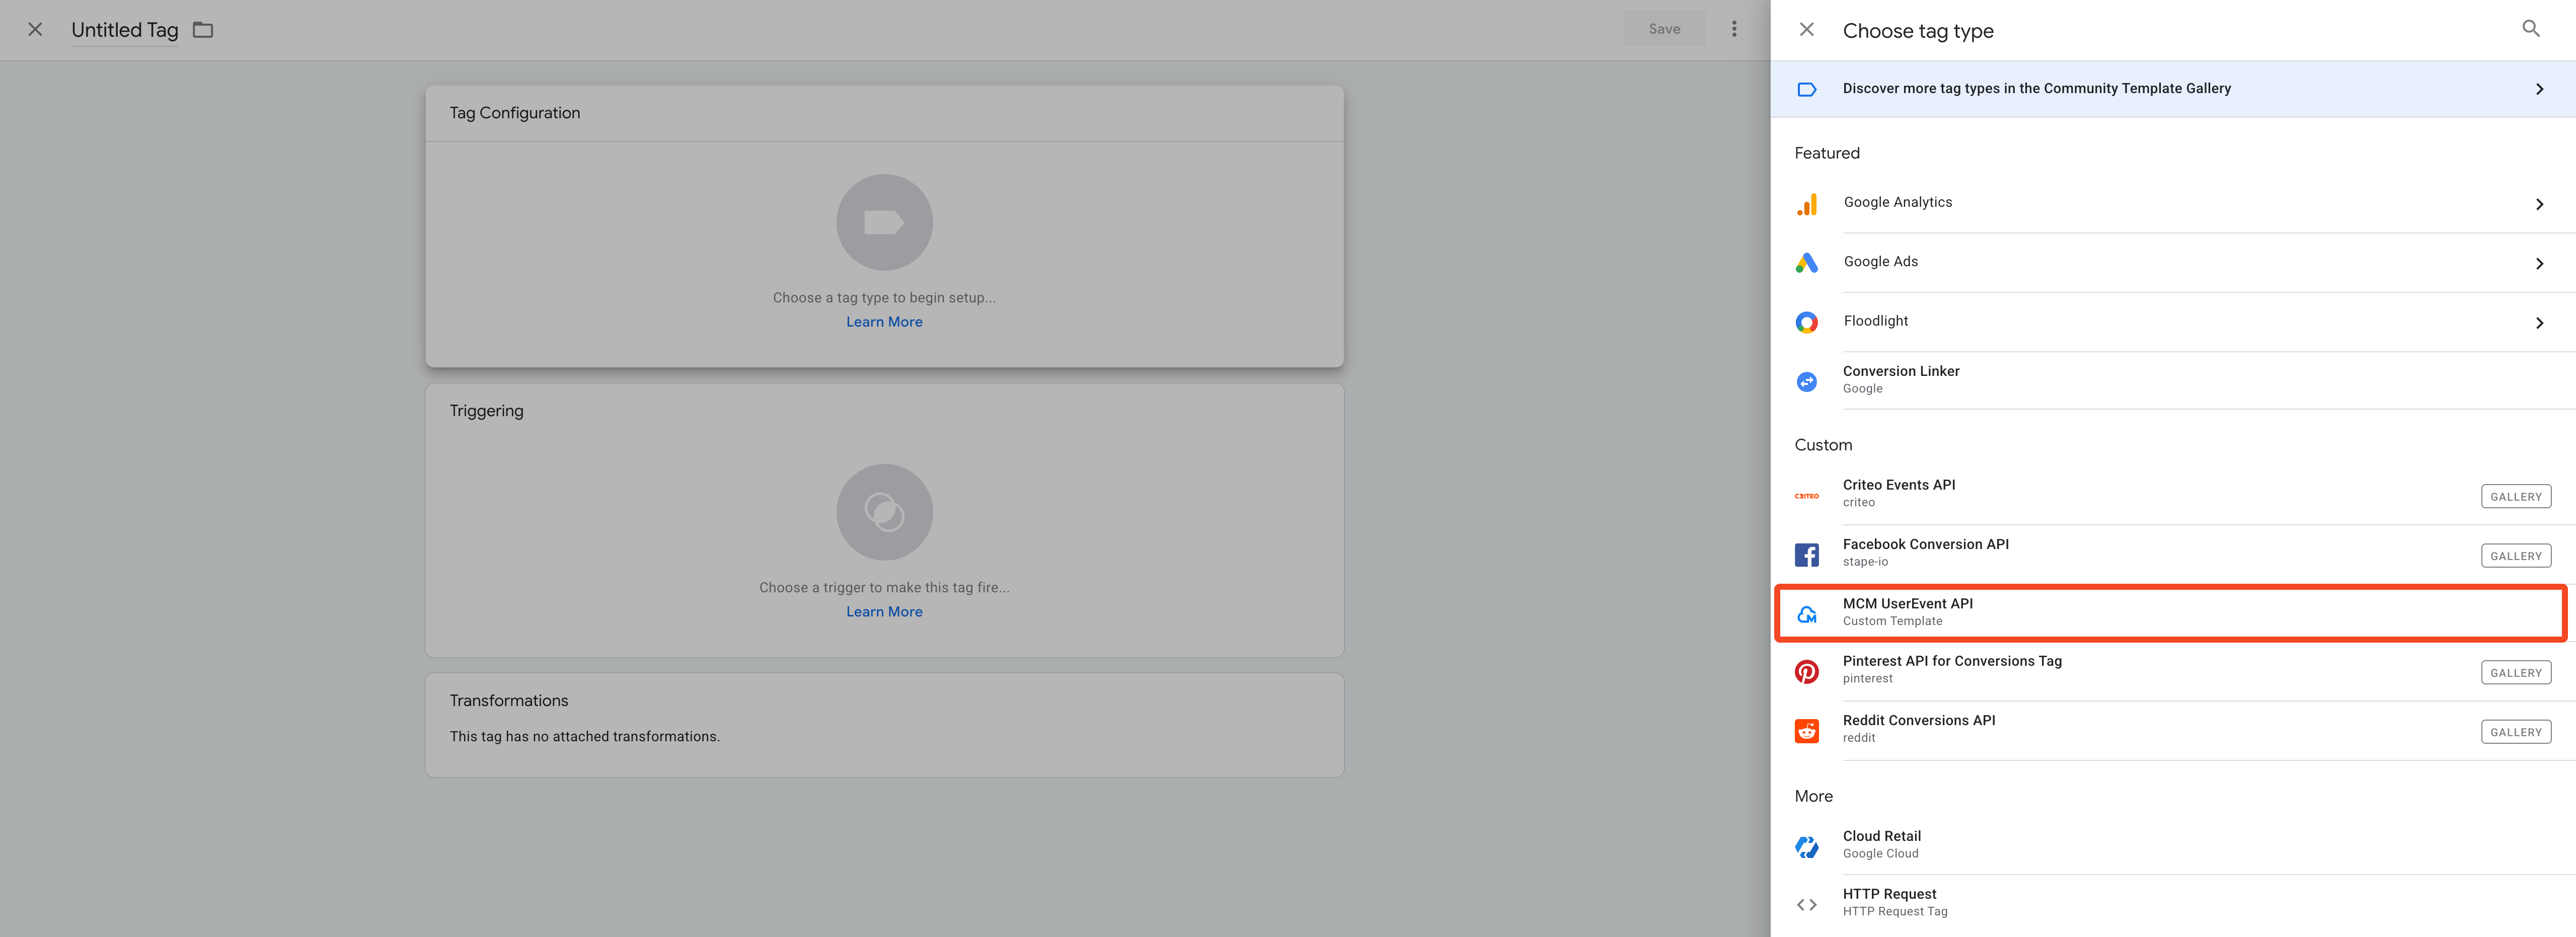
The official MCM User Event API Server-side templates is available in the Community Template Gallery, and contains a script to send API request to MCM Event API with required body contents per event_type. If you are not able to find the template in the Community Template Gallery, you may also choose to manually import the template by downloading it from this Github repository and following the official guide here.
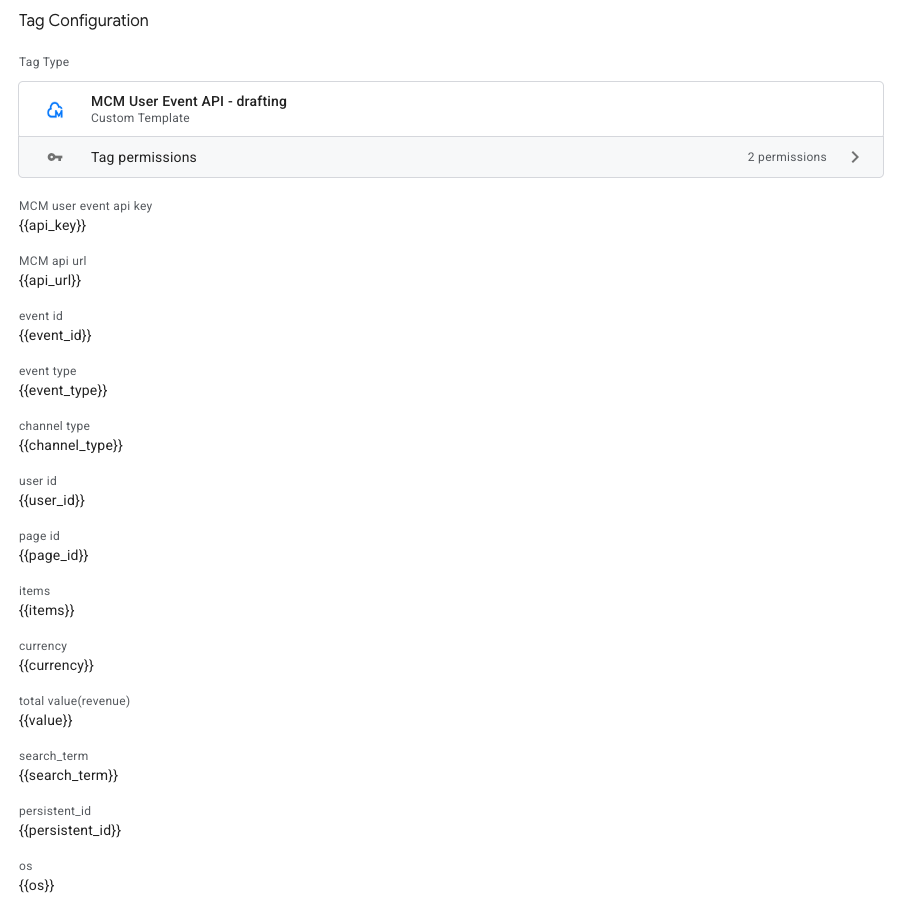
When you import the provided tpl file, the following configuration will be added on your template.

Follow these steps to add the MCM User Event API template to your workspace:
- In your GTM server-side workspace, navigate to Template
- Under Tag Template, click Search Gallery
- In the search field, type "Moloco" and you will find the MCM User Event API template
- Click on Add to workspace, then click again on Add
When the template has been successfully added, the following fields will be populated:
| Field name | Description |
|---|---|
| api_key | MCM User Event API key |
| api_url | MCM User Event API endpoint |
| id | Event ID |
| event_type | Event type |
| channel_type | Channel type (APP/SITE) |
| user_id | User ID |
| page_id | Page ID |
| items | Items |
| currency | Currency |
| value | Amount |
| search_term | Search keyword |
| device | Device info |
| persistent_id | Persistent ID |
| os | OS |
Variables
The following variables are required to parse the event contents and deliver those through Tag (MCM user event API).
| Variable name | Type | Value / Key Path / Format |
|---|---|---|
| api_key | Constant | <<Replace by your MCM Event API key>> |
| api_url | Constant | <<Replace by your MCM Event API endpoint>> |
| currency | Event Data | currency |
| persistent_id | Event Data | persistent_id |
| os | Event Data | client_hints.platform |
| event_id | Event Data | event_id |
| items | Event Data | items |
| page_id | Event Data | page_id |
| event_type | Event Name | Change Case to Uppercase |
| search_term | Event Data | search_term |
| user_id | Event Data | user_id |
| value | Event Data | value |
| channel_type | Event Data | channel_type |
Tags & Triggers
The following tags are required to capture GA4 events fired from your site:
Sending Events to GA4
(If you do not use GA4 for reporting or analysis, you may skip this section)
Every time GA4 tags from the GTM web container sends data to the GTM server container, the GA4 client will catch it and make the data available to tags, variables, etc inside of the GTM server container. When that happens, you must create a Google Analytics 4 server tag to send the data further to GA4 servers.
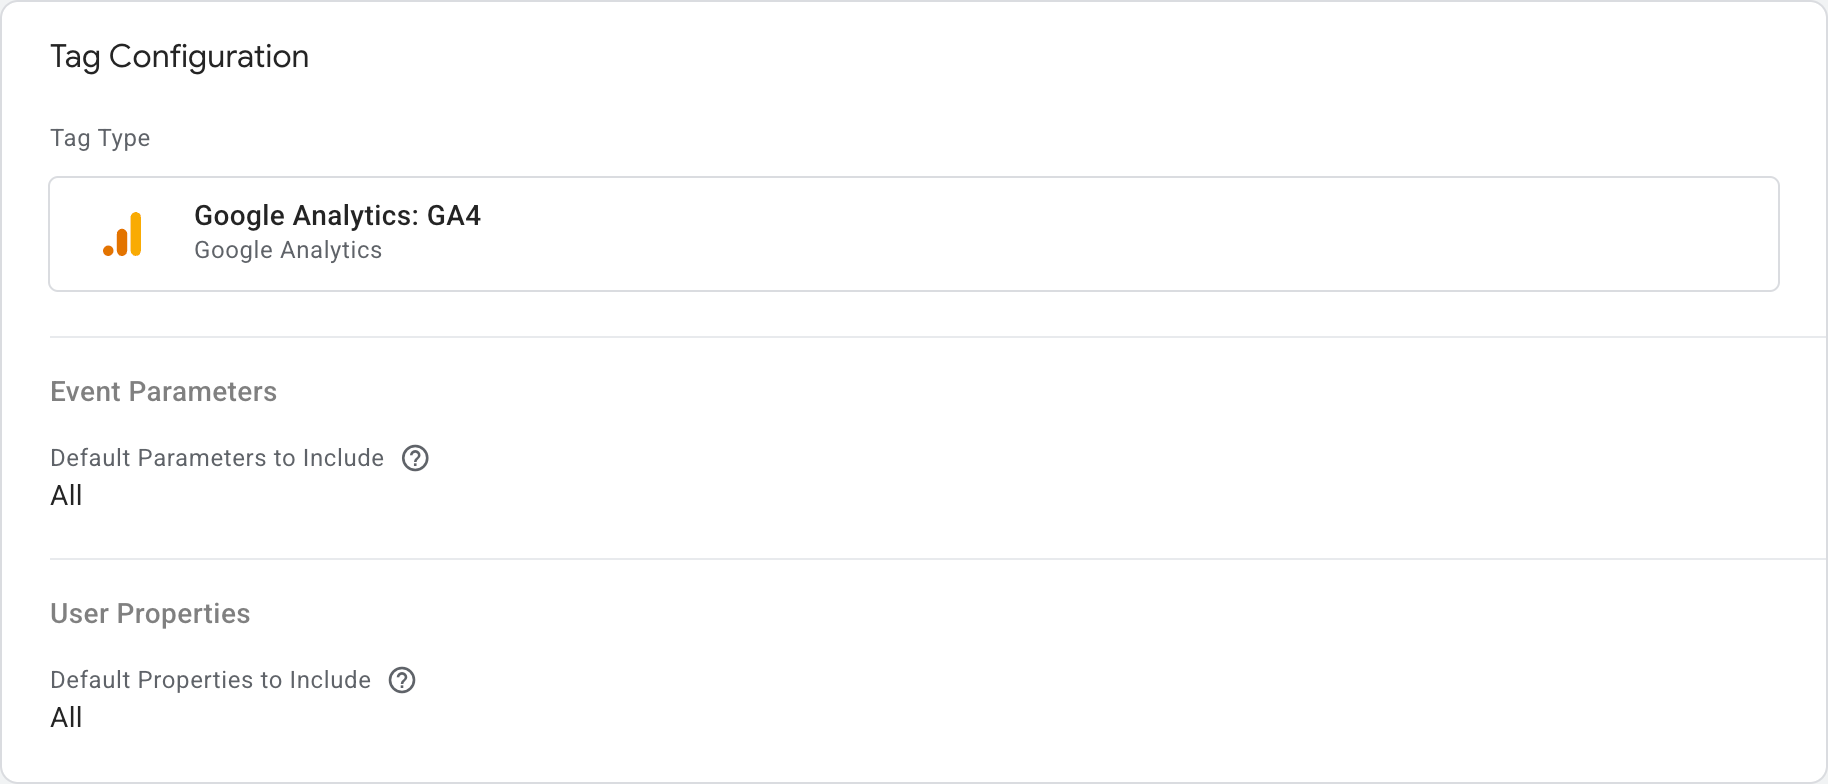
To create the one GA4 tag, go to Tags > New > Google Analytics: GA4. This tag will forward all the data from a Google Analytics 4 client. We will not update anything under Event Parameters or User Properties at this time.
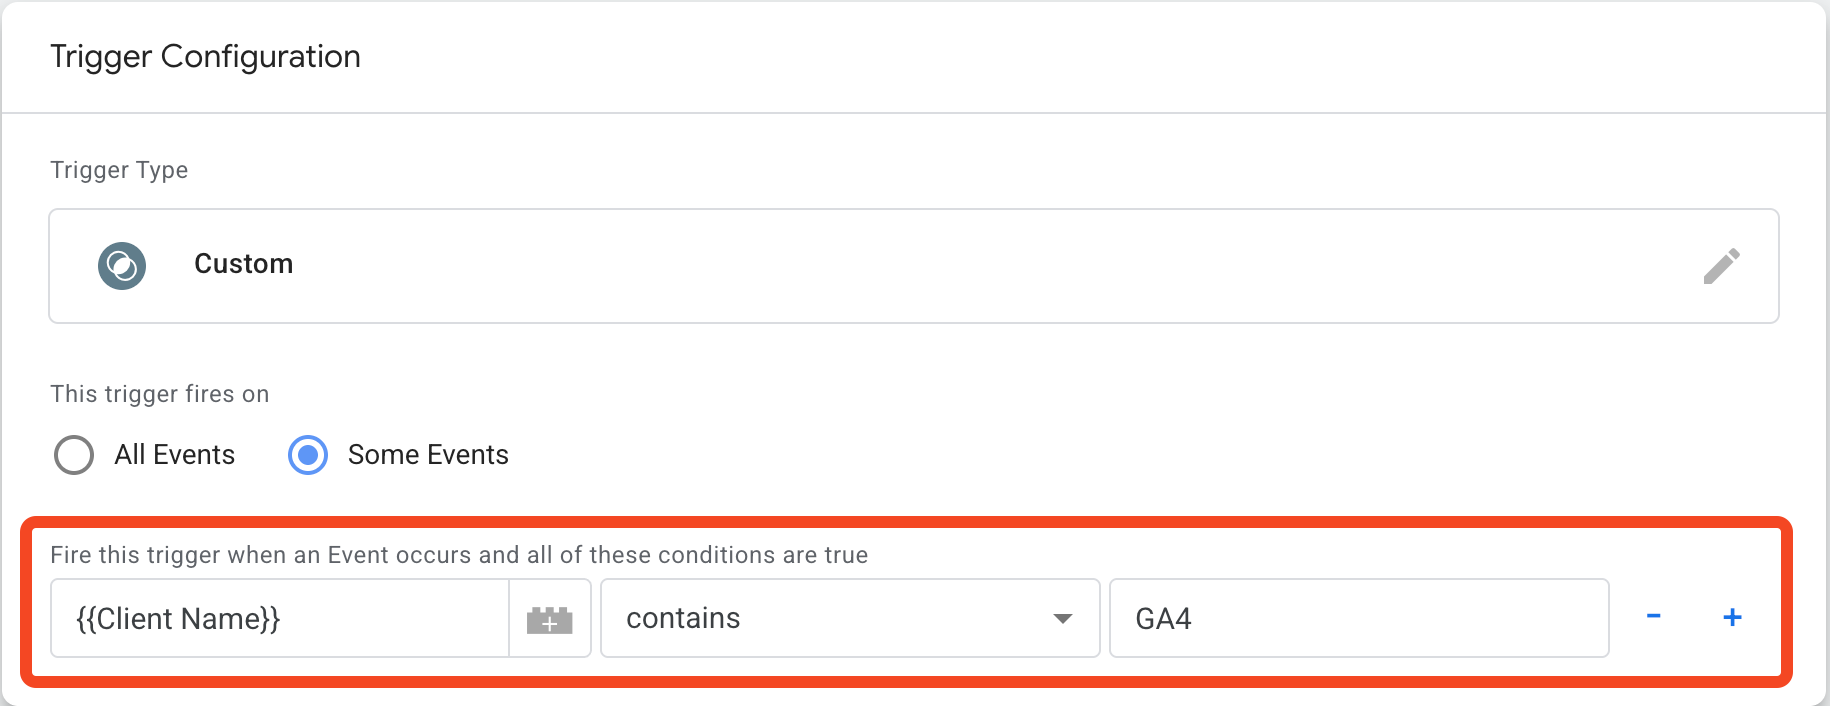
In the Triggering section, create a new trigger by clicking on the "+" icon on the top right of the "Choose a trigger" modal window with the following trigger configurations:
- Trigger type: Custom
- This trigger fires on: "Some Events"
- {{Client Name}} equals ‘GA4’ - If you do not see "{{Client Name}}" in the list of selections, select "Choose Built-In Variable..." --> "Client Name"
MCM user event API
By using the ‘MCM User Event API template’ imported previously, you can easily create the ‘MCM user event API’ tag to send HTTPS request to Moloco MCM's Event API when the designated event is received.
Then you will need to assign the variables previously created to each field.
In the Triggering section, create a new trigger with the following config:
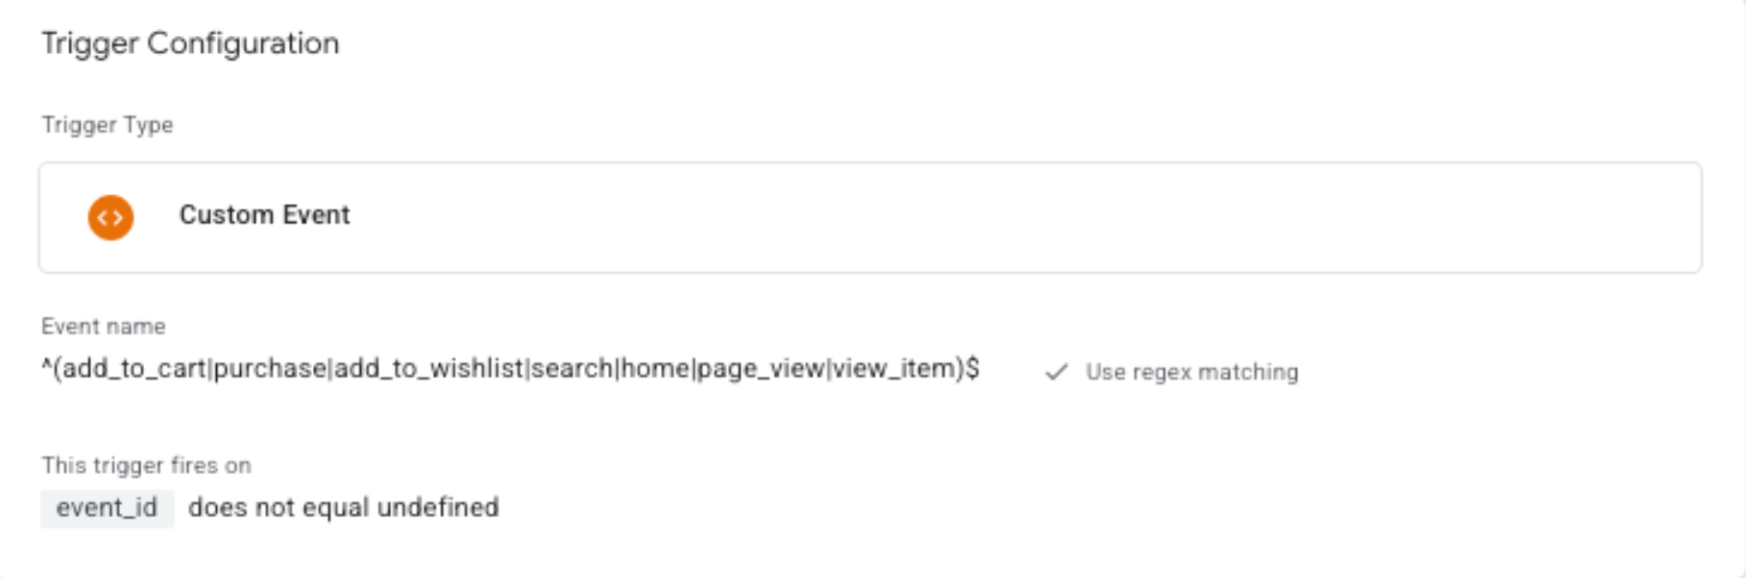
- Trigger type: Custom Event
- Event name: (Use regex matching)
^(add_to_cart|purchase|add_to_wishlist|search|home|page_view|view_item)$ - This trigger fires on: event_id does not equal undefined
NOTE: The last setting is needed to avoid GA default event triggering MCM user event Tag
Client-side GTM web container config setup
The section below describes the different configurations required for collecting user events on the client side and then forwarding them to the server-side GTM container.
Variables
For MCM tags to send the needed data to MCM User API, we need to prepare some variables that will be sent with each event.
| Variable name | Type |
|---|---|
| search_term | URL |
| server_container_url | Google Tag: Configuration Settings |
| event_id | Custom Javascript |
| channel_type | Custom Javascript |
| user_id | 1st Party Cookie or Data Layer Variable |
| persistent_id | 1st Party Cookie or Data Layer Variable |
| common_fields | Google Tag: Event Settings |
search_term
If you are already sending a ‘search’ event according to Recommended Events guide of Google Analytics, you can retrieve the search_term parameter using a Data Layer variable as shown below.
- Type: Data Layer Variable
- Data Layer Variable Name: search_term
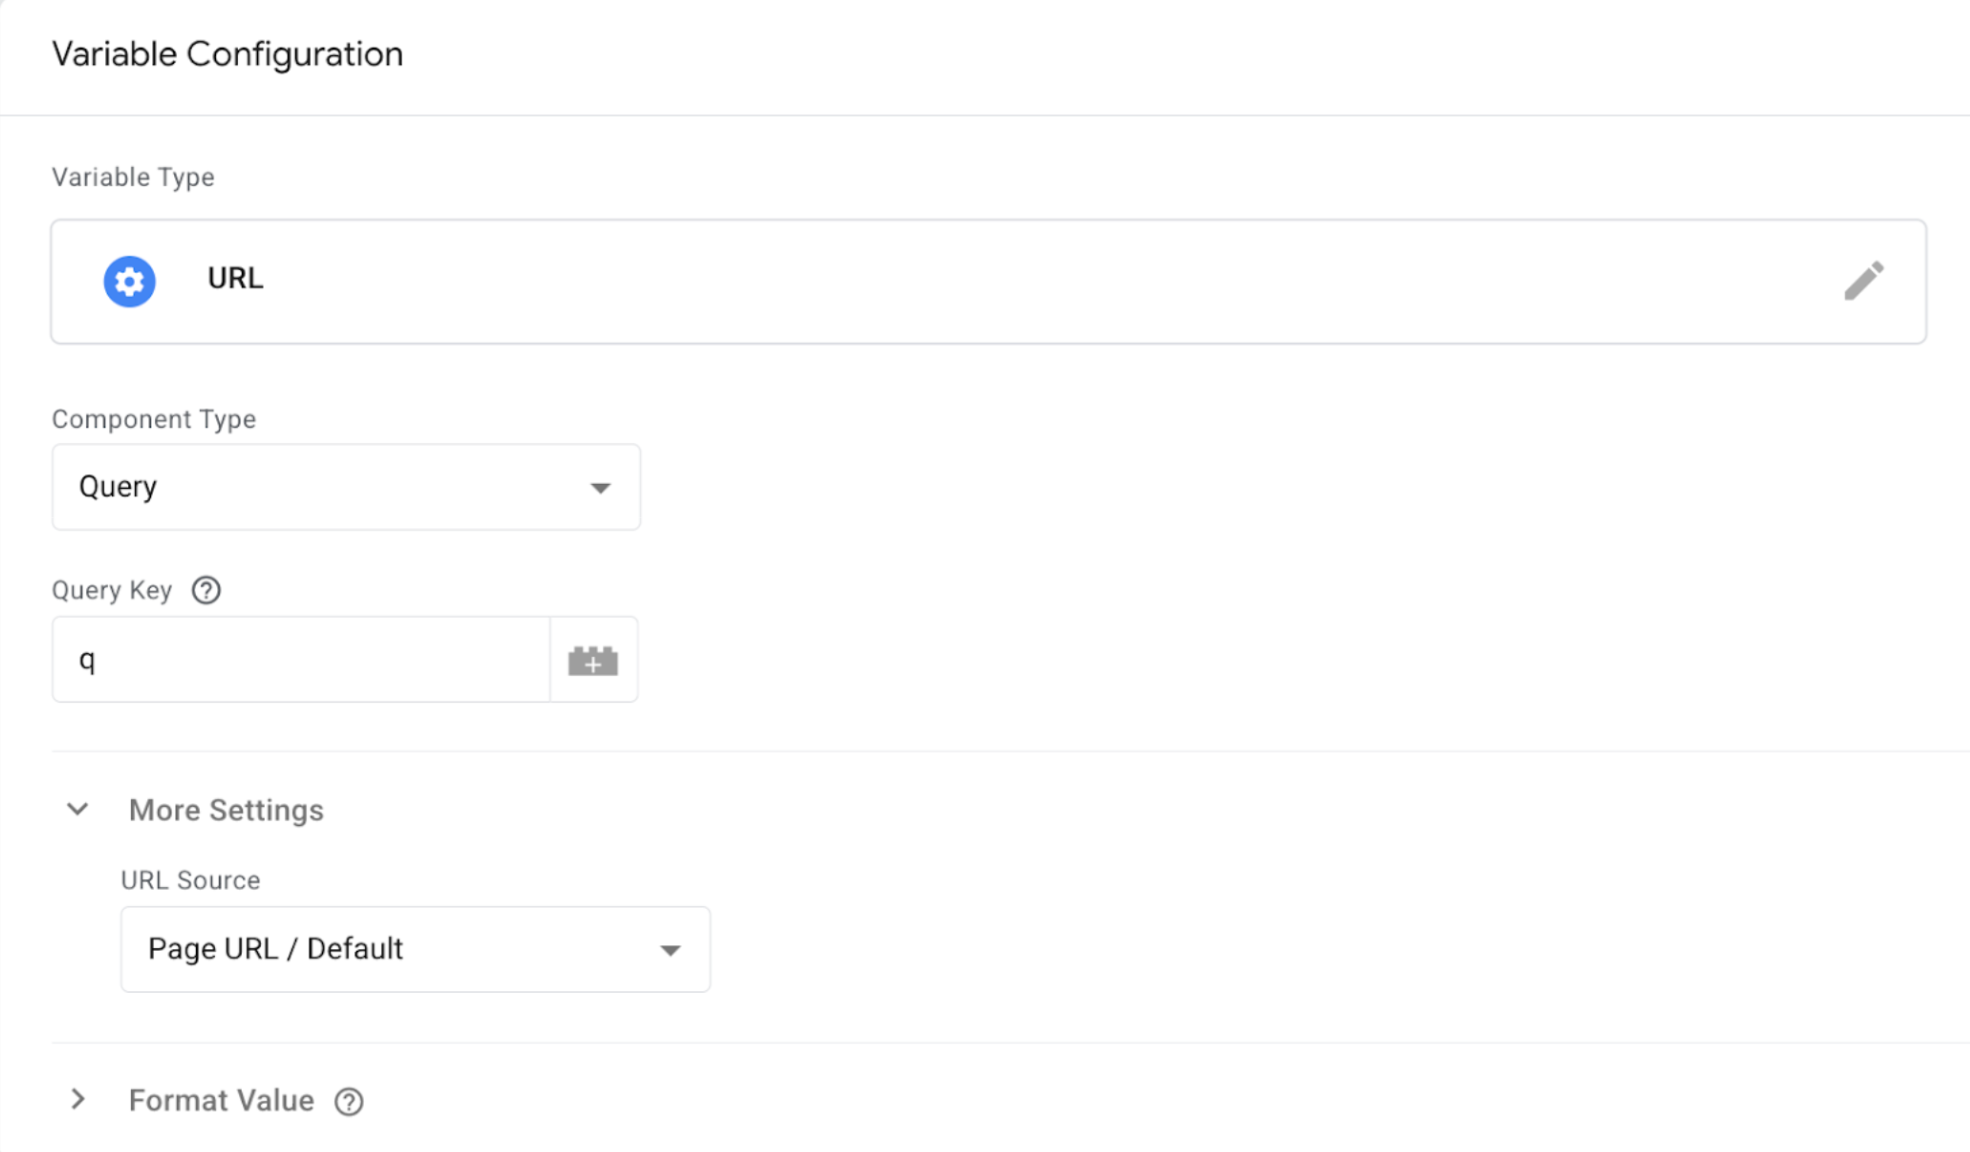
If you are not currently pushing a search event, you can alternatively trigger the search event by detecting the page URL and retrieving the search_term from it.
If your site has an url format for search page similar to https://yoursite.com/search?q=my_search_query, then you can create a new variable as below:
- Variable Name: Search_term
- Variable Type: URL
- Component Type: Query
- Query Key: q
server_container_url
- Variable Name: Server_container_url
- Variable Type: Google Tag:Configuration Settings
- Config parameter: server_container_url
- Value: Your cloud run server url
More detailed information about sending events to server-side container is available here.
event_id
- Variable Name: Event_id
- Variable Type: Custom JavaScript
- Custom Javascript: Script to generate random event ID
function() { return Math.random().toString(36).substr(2, 10); }
channel_type
You may have your own way to recognize which environment your users are in for the session.
In below example, User Agent information determines which environment your user is in.
- Variable Name: Channel_type
- Variable Type: Custom JavaScript
- Custom Javascript: Script to detect the channel_type from the user agent information.
function() { var ua = navigator.userAgent.toLowerCase(); if (ua.indexOf("android") > -1 || ua.indexOf("iphone") > -1 || ua.indexOf("ipad") > -1) { return "APP"; } else { return "SITE"; } }
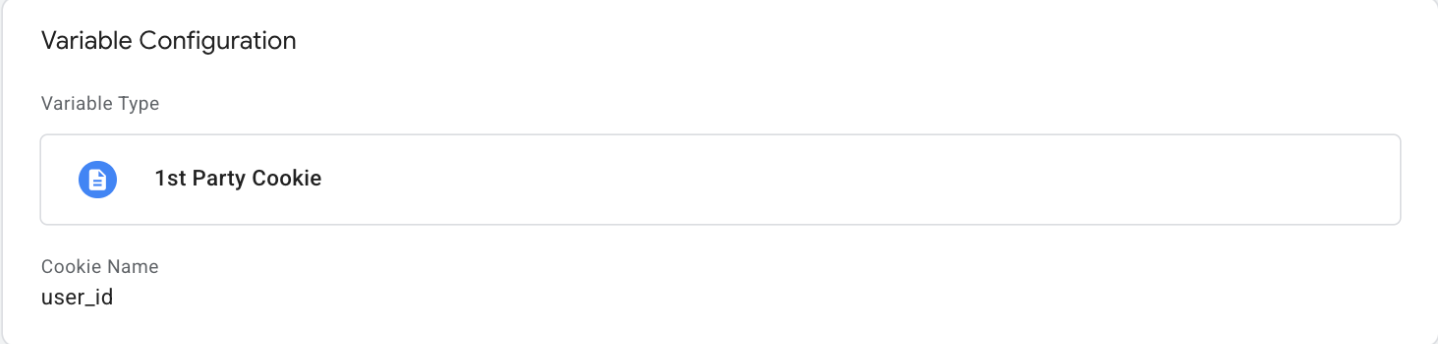
user_id
Please use your own way to retrieve UserID information.
If you store the ID in the 1st party cookie, you can configure the User_ID variable as below.
Please make sure to use hashed value derived from User ID.
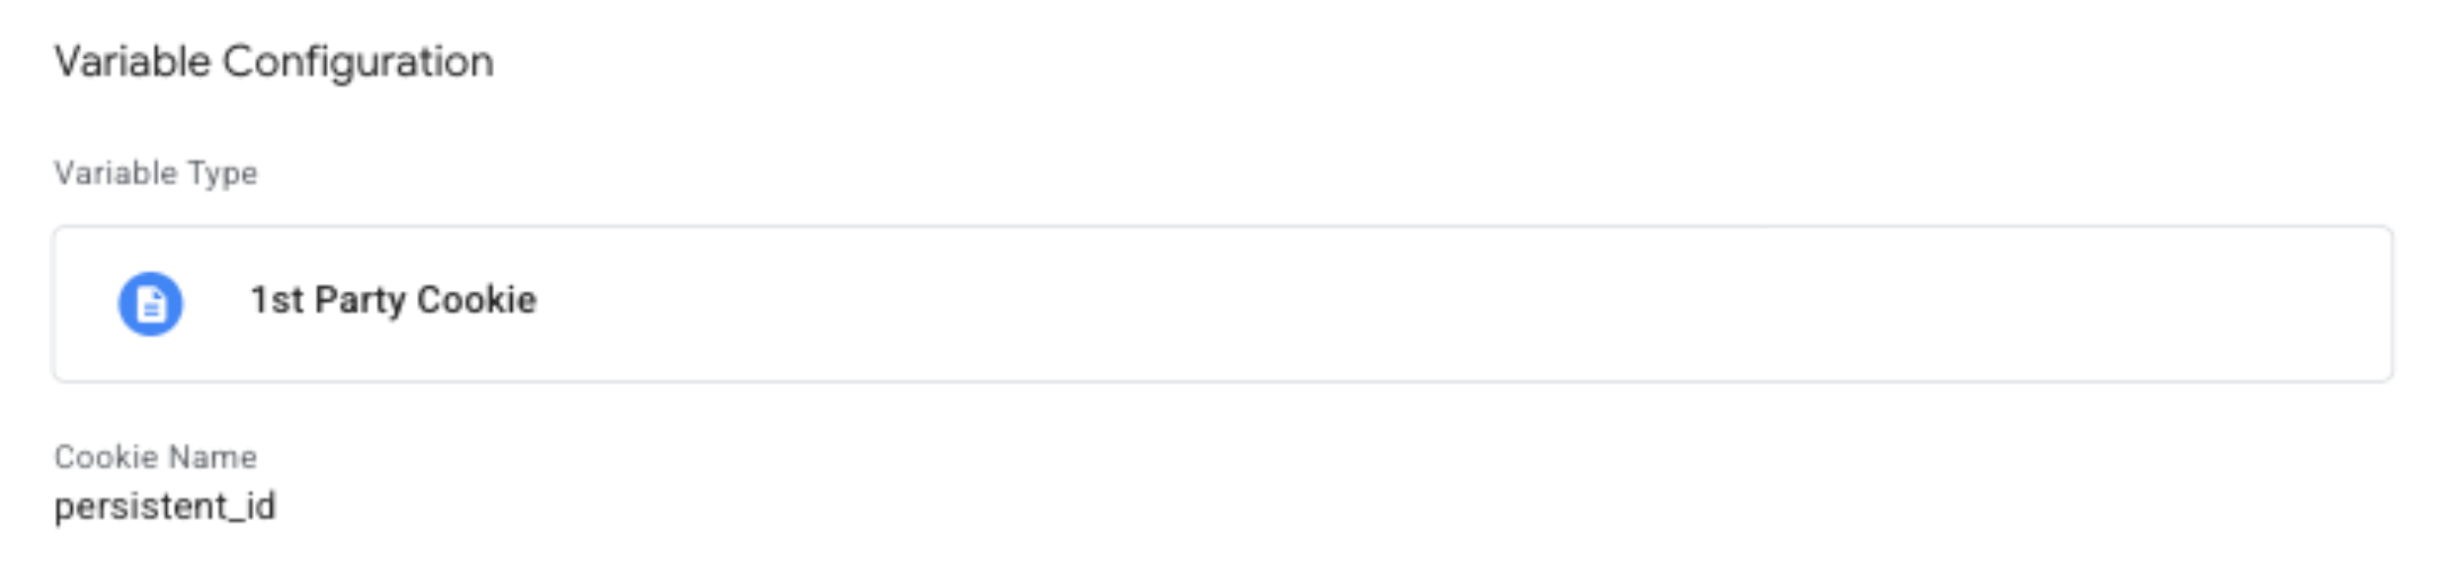
persistent_id
Please use your own way to retrieve PersistentID information.
If you store the ID in the 1st party cookie, you can configure the Persistent_ID variable as below.
common_fields
The following variables are common to all event types, so it’s convenient to config as Event Setting:
- Variable Type: Google Tag: Event Settings
| Event Parameter | Value |
|---|---|
| event_id | {{Event_ID}} |
| page_id | {{Page Path}} |
| user_id | {{User_ID}} |
| persistent_id | {{Persistent_ID}} |
| channel_type | {{Channel_type}} |
Triggers
The following triggers are required to detect and send MCM user events to GTM server-side.
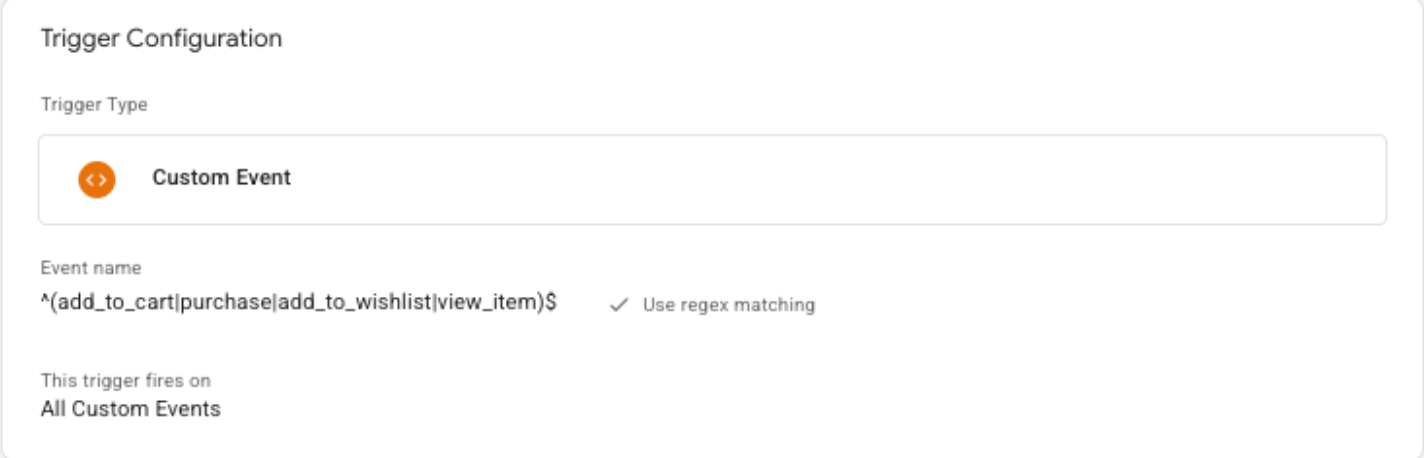
View_item/purchase/add_to_cart/add_to_wishlist
In order to track all events for MCM except for home, page_view and search, create the following trigger:
- Trigger Type: Custom Event
- Event name: ^(add_to_cart|purchase|add_to_wishlist|view_item)$
- Check on ‘User regex matching”
- This trigger fires on: All Custom Events
Search
If you are already pushing a ‘search’ event according to Recommended Events guide of Google Analytics, You can configure a trigger as below:
- Trigger Type: Custom Event
- Event name: search
- This trigger fires on: some custom event : search
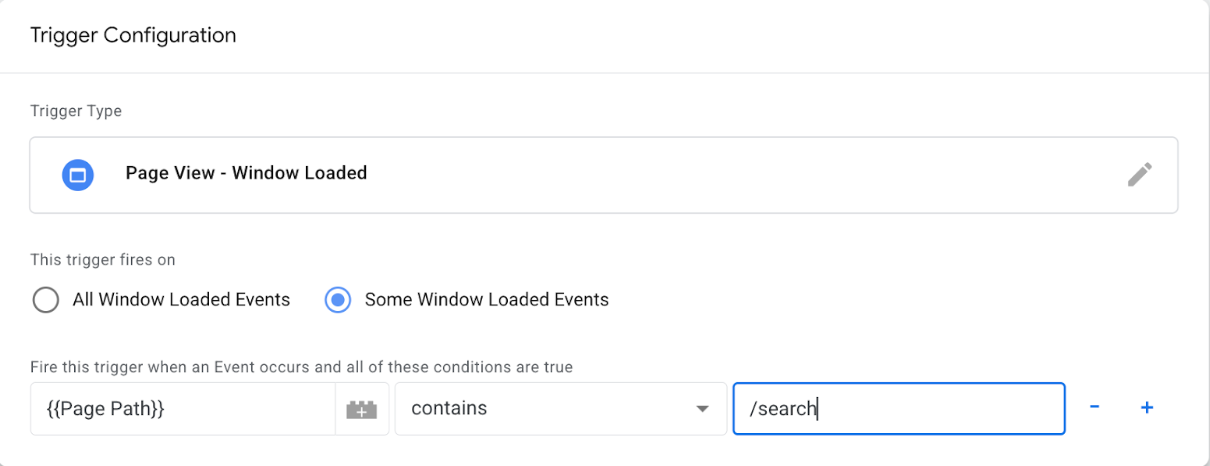
If you are not currently pushing a search event, you can alternatively trigger the search event by detecting the page URL:
- Trigger Type: Page View - Window Loaded (or history change)
- This trigger fires on: Some Window Loaded Events
- {{Page Path}} contains ‘/search’ (depending on your site path for search)
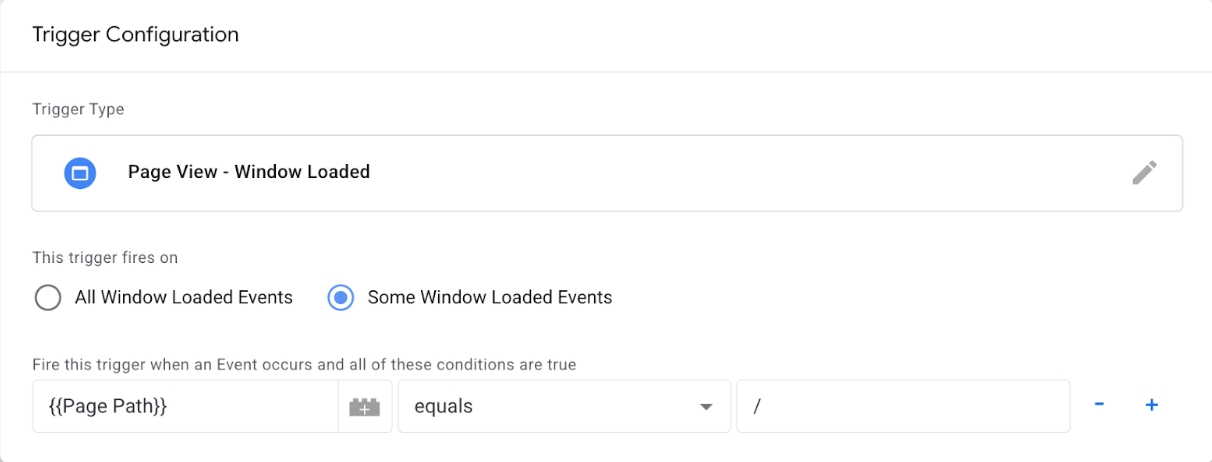
Home - window loaded
Home event to be fired when user lands on home page (path : /).
- Trigger Type: Page View - Window Loaded
- This trigger fires on: Some Window Loaded Events
- {{Page Path}} equals ‘/’
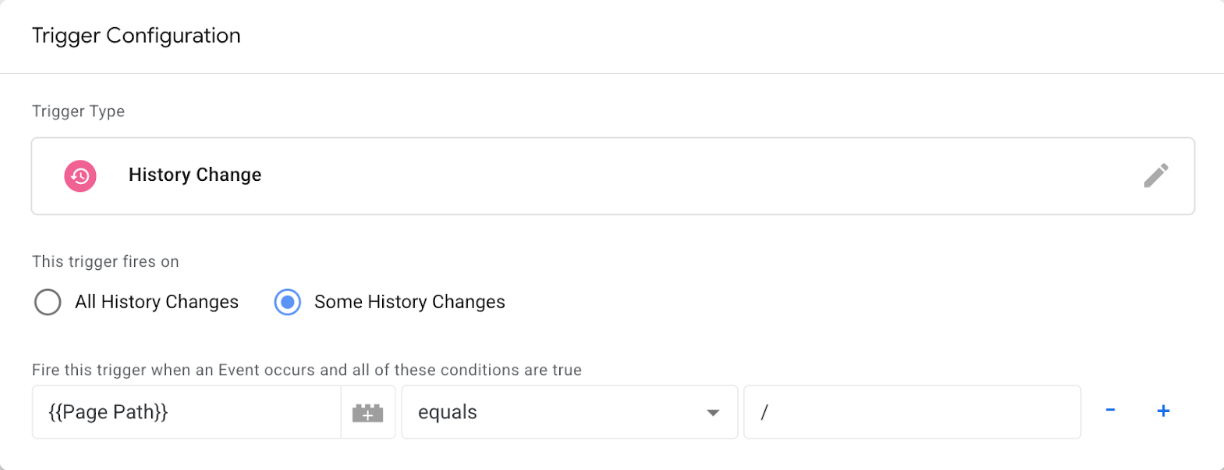
Home - history change
This is another trigger of Home event for SPA type of site.
- Trigger Type: History Change
- This trigger fires on: Some History Changes
- {{Page Path}} equals ‘/’
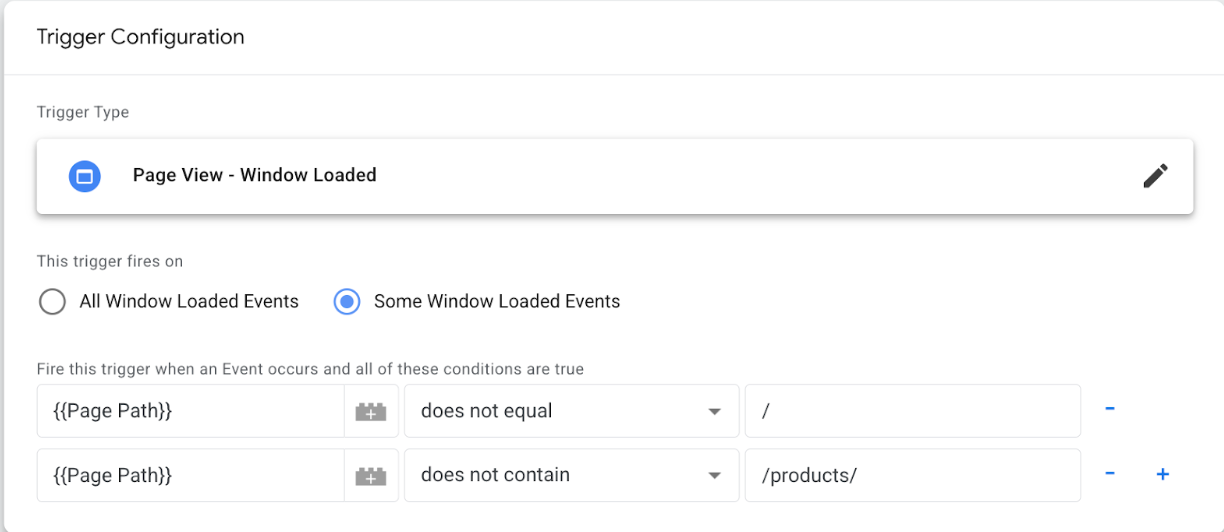
Page_view - Window Loaded
Pageview triggers on page visit event except for Home and Product Detail page
- Trigger Type: Window Loaded
- This trigger fires on: Some Window Loaded Events
- {{Page Path}} does NOT equals ‘/’
- {{Page Path}} does NOT contain ‘/product/’ (Config depends on your Product Detail page path)
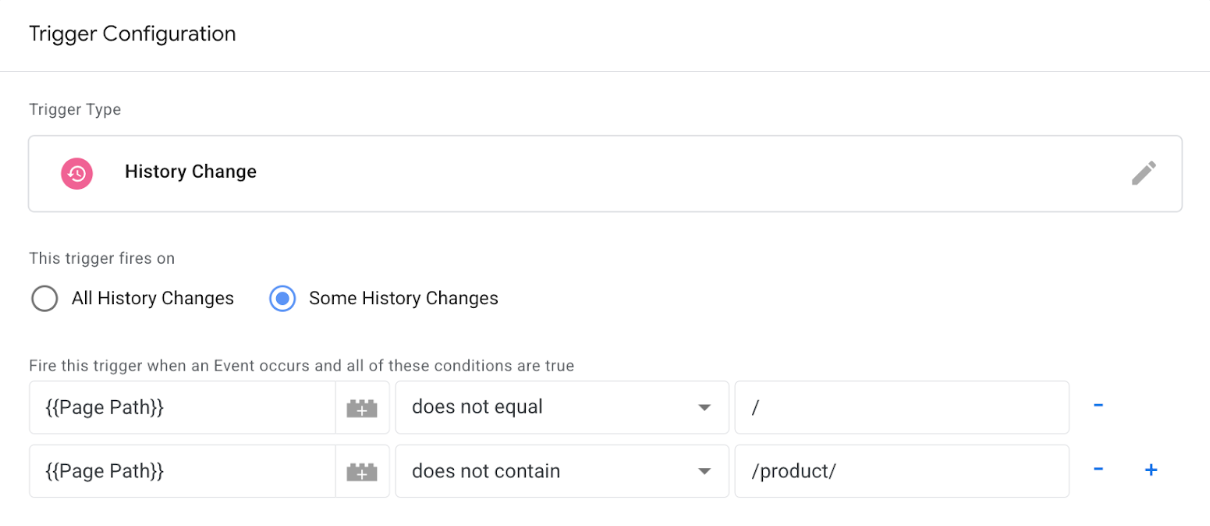
Page_view - History Change
This is another trigger of Page_view event for SPA type of site
- Trigger Type: History Change
- This trigger fires on: Some History Changes
- {{Page Path}} does NOT equals ‘/’
- {{Page Path}} does NOT contain ‘/product/’ (Config depends on your Product Detail page path)
Tags
The following tags are required to capture MCM user events:
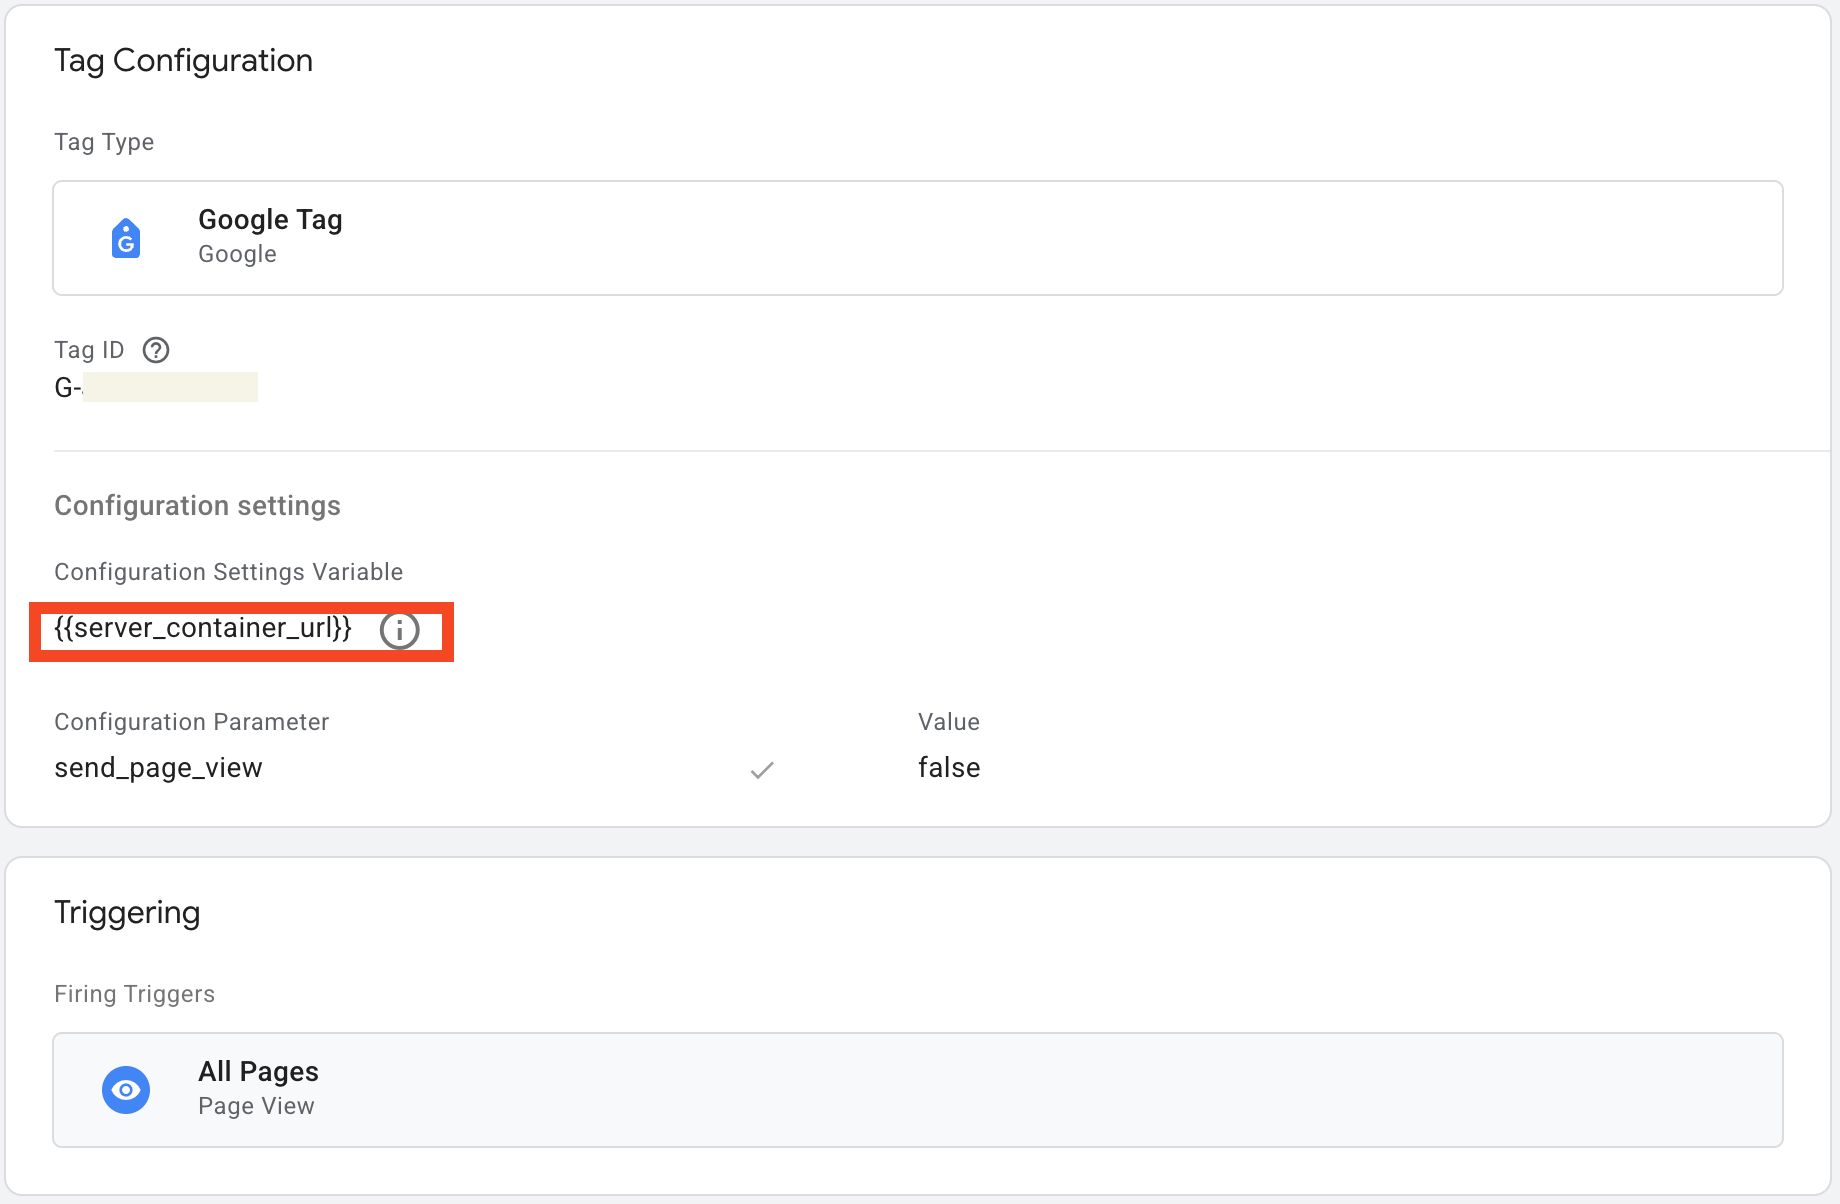
GA4 connection
To set up a Google tag for server-side processing, you need to add your server container URL to the GA4 tag. In your web container, open the Google Tag responsible for activating Google Analytics 4. Then click Configuration settings > Add parameter and enter “server_container_url” as the parameter and your server-side endpoint subdomain as the value.
View_item/purchase/add_to_cart/add_to_wishlist
Those events are fired by all MCM related triggers except for home, page_view and search.
- Tag Type: Google Analytics:GA4 Event
- Event Name: {{Event}}
- Event Parameters:
- Event Setting Variable: {{common_fields}}
- More Settings
- Send Ecommerce Data
- Data source: Data Layer
- Triggering
- Select the previously create trigger: view_item/purchase/add_to_cart/add_to_wishlist

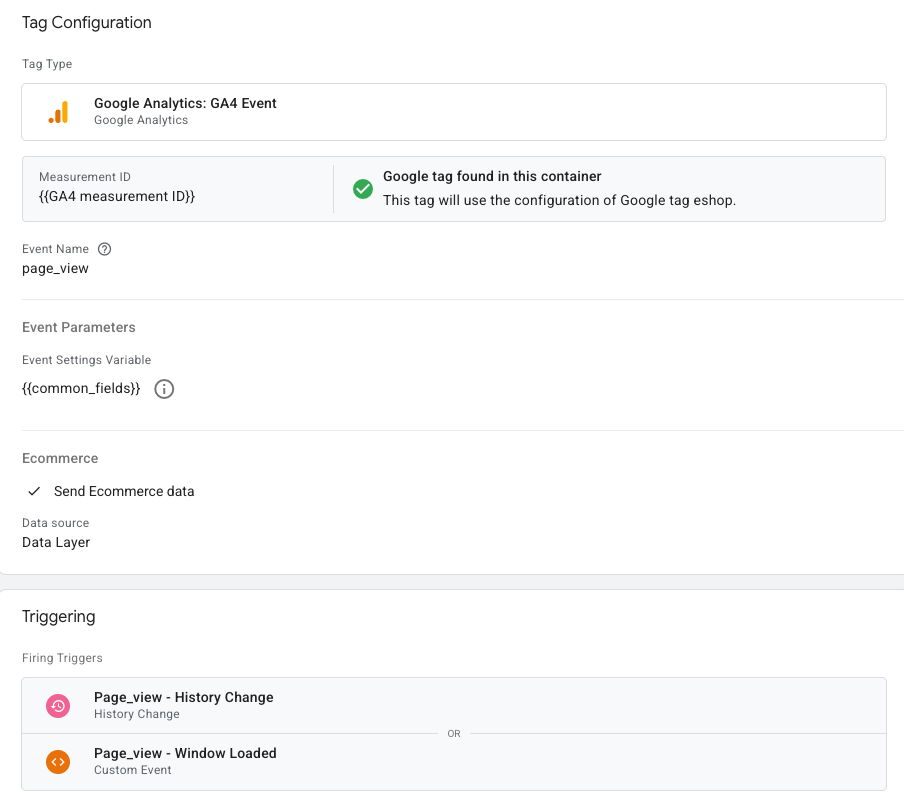
Page_view
The Page_view tag handles page_view event fired by url changes with some conditions.
- Tag Type: Google Analytics:GA4 Event
- Event Name: page_view
- Event Parameters:
- Event Setting Variable: {{common_fields}}
- More Settings
- Send Ecommerce Data
- Data source: Data Layer
- Triggering
- Page_view - History change
- Page_view - Window loaded
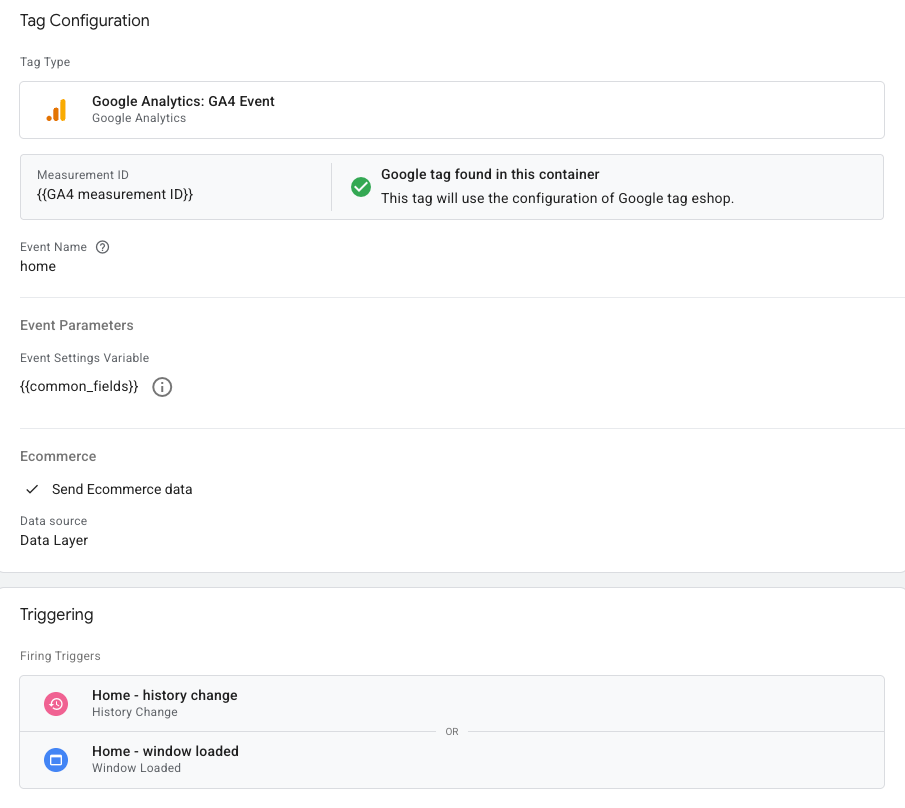
Home
The Home tag handles home event fired by url changes with some conditions.
- Tag Type: Google Analytics:GA4 Event
- Event Name: home
- Event Parameters:
- Event Setting Variable: {{common_fields}}
- More Settings
- Send Ecommerce Data
- Data source: Data Layer
- Triggering
- Home - history change
- Home - window loaded
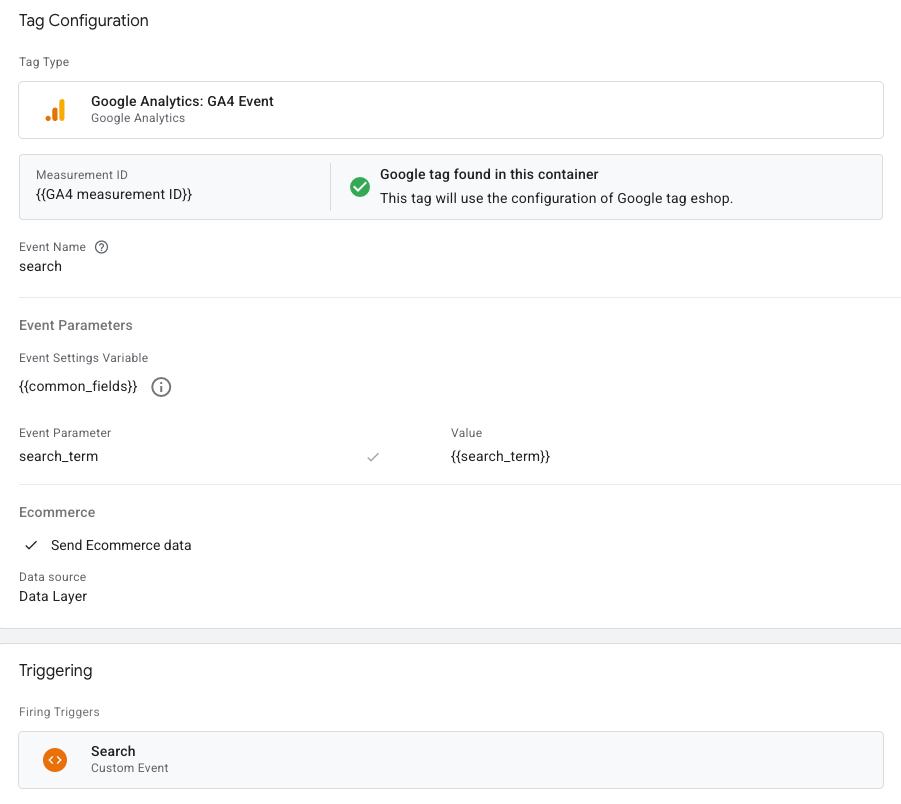
Search
The Search tag handles search event fired by custom event or url changes with some conditions, and additionally delivers {{search_term}} variable along with {{common_fields}}.
- Tag Type: Google Analytics:GA4 Event
- Event Name: search
- Event Parameters:
- Event Setting Variable: {{common_fields}}
- Event parameters:
- search_term: {{search_term}}
- More Settings
- Send Ecommerce Data
- Data source: Data Layer
- Triggering
- search
Sample HTML script
The following sample HTML page can be used to test sending user events to GTM.
<!DOCTYPE html>
<html lang="en">
<head>
 <meta charset="UTF-8" />
 <meta name="viewport" content="width=device-width, initial-scale=1.0" />
 <title>GTM-MCM Demo Event Page</title>
 <!-- Google Tag Manager -->
 <script>
   (function(w,d,s,l,i){w[l]=w[l]||[];w[l].push({'gtm.start':
   new Date().getTime(),event:'gtm.js'});var f=d.getElementsByTagName(s)[0],
   j=d.createElement(s),dl=l!='dataLayer'?'&l='+l:'';j.async=true;j.src=
   'https://www.googletagmanager.com/gtm.js?id='+i+dl;f.parentNode.insertBefore(j,f);
   })(window,document,'script','dataLayer','<YOUR_GTM_ID>');
 </script>
 <!-- End Google Tag Manager -->
</head>
<body>
 <!-- Google Tag Manager (noscript) -->
 <noscript><iframe src="https://www.googletagmanager.com/ns.html?id=<YOUR_GTM_ID>"
 height="0" width="0" style="display:none;visibility:hidden"></iframe></noscript>
 <!-- End Google Tag Manager (noscript) -->


 <h1>Hello, Demo event page!</h1>
 <button onclick="handleAddToCartButtonClick({ productId: 'prod-1' })">Add to Cart</button>
 <button onclick="handlePurchaseButtonClick()">Purchase</button>
 <button onclick="handleHomeButtonClick()">Home</button>
 <button onclick="handlePageViewButtonClick()">Page View</button>
 <button onclick="handleAddToWishlistButtonClick()">Add to Wishlist</button>
 <button onclick="handleItemPageViewButtonClick()">Item Page View</button>


 <form id="searchForm">
   <input type="text" id="searchInput" placeholder="Search..." required />
   <button type="submit">Search</button>
 </form>


 <script>
   document.cookie = "persistent_id=id_from_cookie; path=/; max-age=" + (60 * 60 * 24 * 365);
   document.cookie = "user_id=user_id_from_cookie; path=/; max-age=" + (60 * 60 * 24 * 365);


   const product = {
     id: 'test-prod-1',
     title: 'Test Product',
     price: { amount: 449.99, currency: 'USD' }
   };
   const product2 = {
     id: 'test-prod-2',
     title: 'Test Product 2',
     price: { amount: 549.99, currency: 'USD' }
   };
   const channel_type = 'SITE';


   const addFn = ({ item }) => console.log('Item added to cart:', item);


   document.getElementById('searchForm').addEventListener('submit', function(event) {
     event.preventDefault();
     const searchQuery = document.getElementById('searchInput').value;
     window.dataLayer = window.dataLayer || [];
     window.dataLayer.push({
       event: 'search',
       channel_type,
       search_term: searchQuery
     });
     console.log('Search event pushed:', searchQuery);
   });


   const handleAddToCartButtonClick = ({ productId }) => {
     addFn({ item: { productId, quantity: 1 } });
     window.dataLayer.push({
       event: 'add_to_cart',
       channel_type,
       ecommerce: {
         currency: product.price.currency,
         value: product.price.amount,
         items: [
           { item_id: product.id, item_name: product.title, price: product.price.amount, quantity: 1 },
           { item_id: product2.id, item_name: product2.title, price: product2.price.amount, quantity: 1 }
         ]
       }
     });
   };


   const handlePurchaseButtonClick = () => {
     window.dataLayer.push({
       event: 'purchase',
       channel_type,
       ecommerce: {
         currency: product.price.currency,
         value: product.price.amount + product2.price.amount,
         items: [
           { item_id: product.id, item_name: product.title, price: product.price.amount, quantity: 1 },
           { item_id: product2.id, item_name: product2.title, price: product2.price.amount, quantity: 1 }
         ]
       }
     });
   };


   const handleHomeButtonClick = () => {
     history.pushState(null, '', '/');
     renderPageContent();
   };


   const handlePageViewButtonClick = () => {
     history.pushState(null, '', '/page_view');
     renderPageContent();
     window.dataLayer.push({
       event: 'page_view',
       page_type: 'page_view',
       channel_type
     });
   };


   const handleAddToWishlistButtonClick = () => {
     window.dataLayer.push({
       event: 'add_to_wishlist',
       channel_type,
       ecommerce: {
         currency: product.price.currency,
         value: product.price.amount,
         items: [
           { item_id: product.id, item_name: product.title, price: product.price.amount, quantity: 1 },
           { item_id: product2.id, item_name: product2.title, price: product2.price.amount, quantity: 1 }
         ]
       }
     });
   };


   const handleItemPageViewButtonClick = () => {
     window.dataLayer.push({
       event: 'view_item',
       channel_type,
       ecommerce: {
         items: [
           { item_id: product.id, item_name: product.title, price: product.price.amount, quantity: 1 },
           { item_id: product2.id, item_name: product2.title, price: product2.price.amount, quantity: 1 }
         ]
       }
     });
   };


   const renderPageContent = () => {
     const banner = document.getElementById('pageViewBanner') || document.getElementById('homeBanner');
     if (banner) banner.remove();


     const newBanner = document.createElement('div');
     newBanner.style.fontSize = '24px';
     newBanner.style.marginTop = '20px';


     if (location.pathname === '/page_view') {
       newBanner.id = 'pageViewBanner';
       newBanner.textContent = 'This is the Page View Page';
       newBanner.style.color = 'blue';
     } else {
       newBanner.id = 'homeBanner';
       newBanner.textContent = 'This is the Home Page';
       newBanner.style.color = 'green';
     }


     document.body.appendChild(newBanner);
   };


   window.addEventListener('load', renderPageContent);
   window.addEventListener('popstate', renderPageContent);
 </script>
</body>
</html>
Updated 4 months ago